mod_jk is a replacement to the elderly mod_jserv. It is a plug-in that handles the communication between Tomcat and Apache.
In this tutorial, we assume that a stable Apache Web Server 2.X has been
installed on your host. The next step in the checklist is downloading
the latest stable release of Tomcat mod_jk, available at
http://www.apache.org/dist/tomcat/tomcat-connectors/jk/binaries/
Once downloaded, the module mod_jk.so should be copied in your Apache
module directory (usually located in the APACHE_ROOT/modules directory).
Check your Apache documentation if you cannot locate it.
Windows users are encouraged to rename the binary file to mod_jk.dll if
the downloaded Windows module bears the .so extension. This way you will
not confuse this library with a compiled library for Unix.
The configuration of mod_jk can be included into the Apache httpd.conf
file or held in an external file, which is a good practice:
# Load mod_jk module
LoadModule jk_module modulesc/mod_jk.so # UNIX
# LoadModule jk_module modules/mod_jk.dll # WINDOWS
# Where to find workers.properties
JkWorkersFile /etc/httpd/conf/workers.properties
# Where to put jk shared memory
JkShmFile /var/log/httpd/mod_jk.shm
# Where to put jk logs
JkLogFile /var/log/httpd/mod_jk.log
# Set the jk log level [debug/error/info]
JkLogLevel info
# Select the timestamp log format
JkLogStampFormat "[%a %b %d %H:%M:%S %Y] "
# Send everything for context /yourApplication to mod_jk loadbalancer
JkMount /yourApplication/* loadbalancer
The module is loaded in memory by the LoadModule directive; the
configuration of the single nodes is contained in a separate file named
workers.properties, which will be examined in a moment.
The
JkMount directive tells Apache which URLs it should forward
to the mod_jk module. Supposing we have deployed a web application
reachable at the web context yourApplication, with the above JKMount
directive all requests with URL path /yourApplication/* are sent to the
mod_jk load balancer. This way, you actually split the requests either
on Apache directly (static contents) or on the load balancer for Java
applications.
So, if you want your web application served directly by Tomcat Web Server you would need to point the browser to this location:
http://localhost:8080/yourApplication
The same web context, proxied by Apache Web server can be reached at:
http://localhost/yourApplication
Additionally, you can use the
JkMountFile directive that allows
dynamic updates of mount points at runtime. When the mount file is
changed, mod_jk will reload its content.
# Load mount points
JkMountFile conf/uriworkermap.properties
The format of the file is /url=worker_name. To get things started, paste the following example into the file you created:
# Mount the Servlet context to the ajp13 worker
/yourApplication=loadbalancer
/yourApplication/*=loadbalancer
This will configure mod_jk to forward requests to /yourApplication Apache web container.
Next, you need to configure the workers file
conf/workers.properties. A worker is a process that defines a communication link between Apache and the Tomcat container.
This file specifies where the different nodes are located and how to
balance the calls between the hosts. The configuration file is made up
of global directives (that are generic for all nodes) and the individual
worker's configuration. This is a sample two-node configuration:
# Define list of workers that will be used
worker.list=loadbalancer,status
# Define Node1
worker.node1.port=8009
worker.node1.host=192.168.10.1
worker.node1.type=ajp13
worker.node1.lbfactor=1
worker.node1.cachesize=10
# Define Node2
worker.node2.port=8009
worker.node2.host=192.168.10.2
worker.node2.type=ajp13
worker.node2.lbfactor=1
worker.node2.cachesize=10
# Load-balancing behaviour
worker.loadbalancer.type=lb
worker.loadbalancer.balance_workers=node1,node2
worker.loadbalancer.sticky_session=1
# Status worker for managing load balancer
worker.status.type=status
In this file, each node is defined using the worker.XXX naming
convention where XXX represents an arbitrary name you choose for each of
the target servlet containers. For each worker, you must specify the
host name (or IP address) and the port number of the AJP13 connector
running in the servlet container.
balance_workers is a comma-separated list of workers that the load balancer need to manage.
sticky_session specifies whether requests with SESSION IDs should
be routed back to the same Tomcat worker. If sticky_session is set to
true or 1, sessions are sticky, otherwise sticky_session is set to
false. (The default is true.)
Finally, we must configure the Web instances on all clustered nodes so
that they can expect requests forwarded from the mod_jk load balancer.
Edit the server.xml file; locate the element and add an attribute
jvmRoute:
... ...
The same attribute is required on
node2:
... ...
You also need to be sure the AJP Connector definition is uncommented. By default, it is enabled.
emptySessionPath="true" enableLookups="false" redirectPort="8443" />
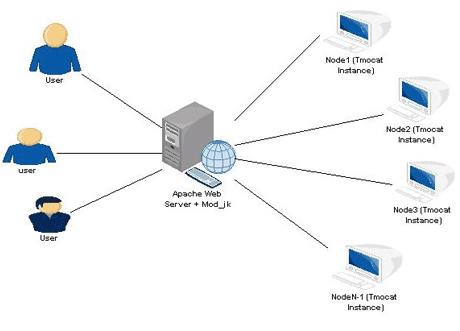 Architecture diagram of Tomcat Load Balancing